You will
need the following tools:
2 x Size 11
spanners.
A Case Gauge
or your gun’s barrel.
A fired case
with the old primer intact.
A few clean
cases.
Let’s first
look at how the system works.
The LM
primes at the top of the stroke unlike the Pro1000 that primes at the bottom of
the stroke. With the LM you can also set your priming depth and this is where
problems happen.
Priming
happens in 2 parts on the LM. Let’s call it Part1 and Part2…
Part1.
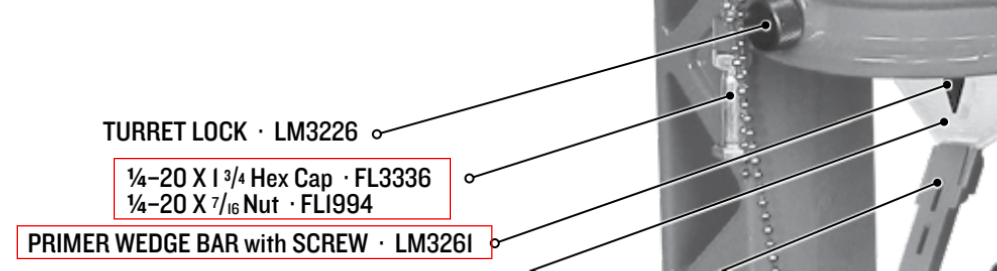
The LM uses
a Primer Rocker Arm (LM3239) to raise the primer pin to seat a primer. The
rocker arm is activated by the bolt on the left side of the turret. This is
called the Primer Actuating Bolt (FL3336).
As you raise
the carrier the rocker is forced down by this bolt and raises the primer pin in
station 2 to seat the primer at the top of the stroke. The primer spring that
fits in the primer pin helps the pin retreat as you lower the carrier.
Part2.
Now your
primers are fed through a primer trough on the other side of the press in
station 2. The Lee primer trough’s all work with gravity…the weight of the
primers in the trough feeds the primer on the primer pin.
Using
gravity to feed primers is the easy way to do things…but what if there is no
case to be primed? You don’t want primers all over the shell plate.
The LM
Primer Trough has a little plastic arm on top of the trough. This stops primers
from being fed when there is no case in station 2.
See pic
below, the black part.
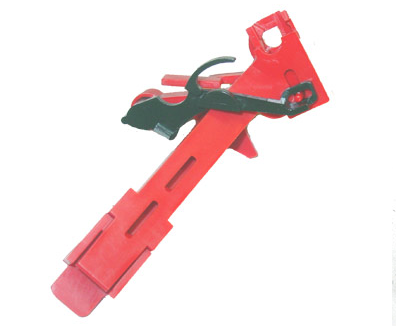
Note this
pic is an old large primer trough and I am using it only to illustrate the
parts easily for you. Latest versions should be all black parts for small
primers and red and white for large primers.
This arm is
activated by a case as it rotates from station 1 to station 2, the case moves
the arm back and that collects a primer into the feeding area of the trough.
This happens
at the bottom of the stroke.
As you raise
the carrier to the top, the Primer Wedge Bar (LM3261) on the right side of the
press pushes the black part of the primer trough over the primer pin to place the
primer on the pin.
The primer
is then seated at the top of the stroke.
Now problems
happen when Part1 and Part2 do not work in sync.
If the
rocker raises the primer pin before the primer trough has placed the primer you
will have flipped primers.
If the
primer wedge bar moves the primer onto the pin before it has raised to the top
you will have crushed primers.
If the
primer pin does not raise all the way to the top you will have primers not
seated fully.
It’s all
about timing.
Now let’s
set your priming system to precision.
Now to do
this properly you will have to reset your Dies. The setting of the Sizing Die
plays a critical role here and once you change that setting you need to adjust
the rest of your Dies.
Remove your
turret from the press.
Remove your
shell plate and inspect your primer trough and pin. Make sure it is clean and
that the inside of the carrier where the trough fits is clean, there must be no
dust, debris or oil here.
Check that
your primer pin spring is straight and in good order.
Replace your
primer system and ensure it is aligned as below.
Replace your
shell plate, index rod etc.
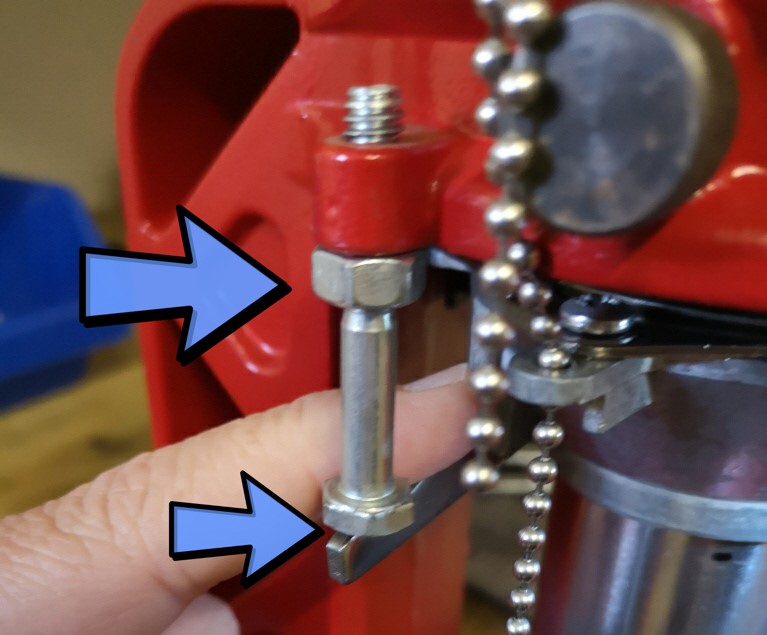
Now look at the primer wedge bar, make sure that is aligned to push the black arm of the primer trough fully in at the top of the stroke. Also make sure that there is no play on the Primer Wedge Bar.
Now let’s
focus on the Primer Actuating Bolt.
Grab your 11
spanners.
Loosen the
nut (FL1994) and turn it down on the bolt as far as it can go.
Now turn the
bolt up as far as it can go.
Insert the
fired case with the old primer in and cycle it to station 2.
Raise the carrier to the top making sure that your press handle is fully engaging the stop. See pic below. That stop must touch the linkage.
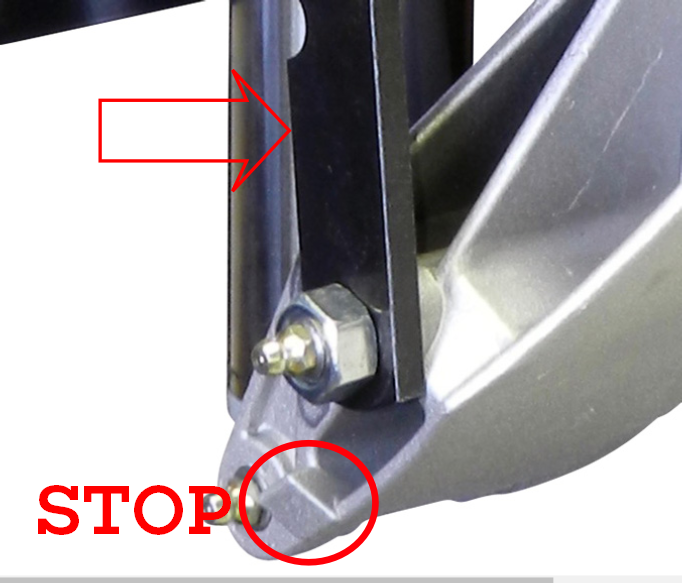
We will
refer to this as the Handle Linkage Stop.
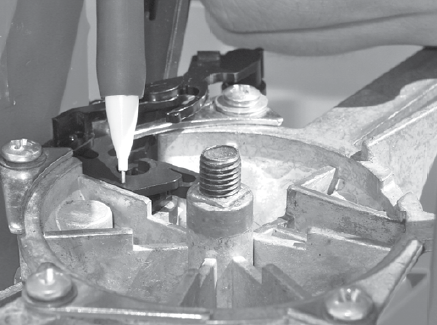
Now turn the
primer actuating bolt down until it makes firm contact with the rocker – there
should be no play in the rocker.
Lower the
carrier and turn the primer actuating bolt down only 2 sides of the nut (The
nut has 6 sides)
Tighten the
primer actuating bolt and make sure there is no play on it – very important.
Use 2x 11
spanners here. One to hold the bolt in position and the other to tighten the
nut to the top. Make sure you do not move the bolt while doing this.
Now if you
raise the carrier to the top you will find that without a case in station 2
there should be a bit of play in the rocker.
With a case
in station 2 there should be no play.
Now refit
your turret and let’s set that Sizing Die.
Your Sizing
Die is set in either in station 1 with the decap pin installed for the 3 Die
setup or in station 2 –without the decap pin for a 5 Die setup.
Raise the
carrier to the top of the stroke.
Start
turning the die into the turret. Turn the die until it makes firm contact with
the carrier, make sure that the stop on the Handle Linkage is engaged.
Grab your
Case Gauge or the barrel of your gun….obviously removed from the gun in a safe
manner.
Size a case
and check if it has sized all the way. Again make sure that the Stop on the Handle
Linkage is engaged.
Take the
case and see if it fits in the Case Gauge or your Barrel, it must be flush and
fall easily in and out of the Gauge/Barrel.
If not turn
the die in in small increments and test until your case is perfectly sized – Do not turn the Die in more than ¼ from
touching the shell plate.
Now check
the Stop on the Handle Linkage, make sure that with the carrier at the top of
the stroke while sizing a case that there is not too big of a gap between the
handle and the stop.
A millimetre
gap is ok.
If you set
your Sizing Die too deep you will find that your primers are not seated flush.
You will then attempt to fix this by turning the Primer Actuating Bolt deeper
and this is where problems start.
If you set
your Sizing Die or any other Die too deep you remove the initial setting of the
Primer Actuating Bolt.
If the
Primer Actuating Bolt is set too deep you will have priming issues as described
above but more importantly you are now placing too much pressure on the carrier
and you will crack your carrier.
Now grab
those clean cases. Fill your Primer Tray and load them into the Primer Trough.
Make sure that the Black Arm on the Primer Trough is in the correct position.
Size and
deprime your cases in station 1 or station 1 and 2 if you are running a 5 Die
Setup. In station 2 at the top of the stroke your cases will be primed.
Open the
Case Retainer at station 3 to remove your primed cases.
Inspect the
primed cases looking for high primers.
If you do
find high primers you can adjust the Primer Actuating Bolt deeper.
BUT make sure you have
eliminated any other issues that could cause high primers.
Have you
ensured that you have raised the carrier to the top of the stroke?
Was the
sizing difficult? Add some lube to assist in sizing.
Are your
primer pockets in good order?
If you have
eliminated the above then only set your Primer Actuating Bolt deeper.
BUT only do this in small
increments and testing after each setting. Remember if you set the Primer
Actuating Bolt too deep you will run into issues.
And a small
change in the Primer Actuating Bolt makes a big change at the Primer Pin end.
If you
follow these steps and learn how the priming system on the Load Master works,
you will find that priming on the Load Master is not an issue and is very easy
to sort.
Priming on
the Load Master is precise…